How to upgrade stereo and install a reverse camera
Parts
Here are a list of parts that you will need, or that may be helpful.
- screw driver / drill with set of bits (you will be encountering many different screws in the process of removing parts)
- car trim removal tools (optional, can achieve the same with a flat head screw driver and elbow grease)
- self tapping screws (may be needed to drill into the body of the car to attach reverse camera)
- cobalt drill bits (may be needed if holed need to be drilled into bumper/body of car to route cables)
- extra clips for car (would probably not need it but would be helpful incase some break)
- multimeter (used to find 12v source when car is in reverse for reverse camera)
- tape (electric and duct, to bind wires / stick things together)
- Coat hanger / wire puller (to pull wires thru tough places)
- Dash kit (different for each car, used to hold stereo in place)
- stereo harness (different for each car, connects stereosystem cables to car's default speaker wires and others)
- wire taps (used to tap into 12 volts for reverse camera)
- Stereo system (many can be found on amazon)
- reverse camera
Installing Stereo
Installing the stereo is actually the easiest part of this tutorial suprisingly, as 90% of the work is simply setting up the harness and connecting it to your stereo's wiring system, the other 10% is removing the old one.
A wiring harness for your car would be quite standard, and you can find various websites for it. The main ones I have used in the past are crutchfield or amazon. Since most wiring harnesses are standard, I recommend that you just go with whatever is cheaper. The wiring harness can be seen as a "converter". It converts whatever wires the stereo requires to the wires that your car uses, which allows your new stereo to send music out to your speakers. When looking for my 2012 honda civic, crutchfield at the time had it cheaper than amazon, however recently when checking for my friends Mazda 3 it was cheaper on amazon. Whatever harness you get the steps are rather standard, simply match colours. Both your car's harness and the stereo system would look something like the below image

Simply connect all the loose wires with whatever colour matches, and take note of the stripes as well. In an idea scenario you would use solder and heat shrink tubing. I personally just used electric tape and twisted the wires together. Once completed, one end will go into the stereo and the other will replace the old stereo's connection and the install is complete. A completed wiring harness will look something like this:
The next step is to find the dash kit that fits your cars make and model. The dash kit is essentially what helps keep your stereo in place and flush with the rest of your interior. Before installing itll look something like this:
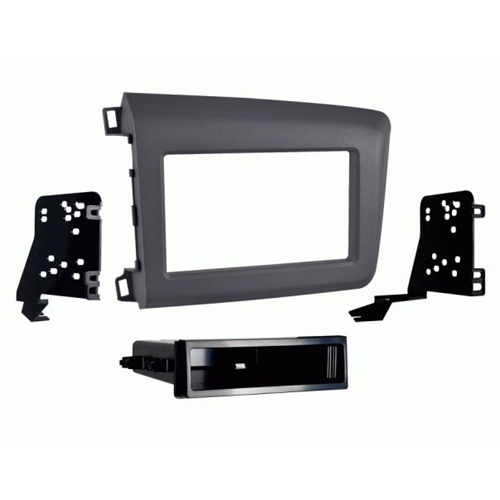
The brackets on the left and right are what actually connect the stereo system to the dash kit, so make sure you use as many screws as you can here.
Once the harness and dashkit is set up, the next step is actually removing the old stereo. This is different from each car, and thus the best choice would be to search how to do this on youtube. Take note and keep track of any and all screws, and if you break a clip or two, generally its no big deal as they are replaceable and sometimes even not needed.
Once the old stereo is removed, plug in the harness you just connected into the car's old harness. Then take your stereo and push it in place. Screw in where necessary and put everything back. Once done you should have something that looks flush and clean like this:

Reverse Camera
Now the reverse camera is actually the tough part, since it'll be completely different for each car, and the only common step being that you route the AV cable (which should come with the camera) thru the stereo, since your stereo should have a connection for it (most modern dins with apple car play do).
Your after market reverse camera will come with a parts list as such:

A3 is the acual camera, A4 is where your camera gets power, and A5 is the video cable that would connect to your DIN and comes with a convenience wire that connects to the 12 volt source that goes into the camera to send a signal to the DIN that the car is in reverse, A1 may or may not be present and is generally not needed if you have an after market stereo.
And your wire taps will have two parts as such:

The tap, which is the thing wrapping the wire, and the input which is crimped to the wire you wish to tap in with.
The first step is to actually get a bit down and dirty. You need to find where your reverse lights are wired. Generally you can simply trace the lamp and find it. Once found, since there will in general be many connections to it, use a multimeter to find where you can get 12 volts. To do this, start your car and put it in reverse with your e-brakes on and start looking for pins that give you 12 volts. From here tag the two wires that run you 12 volts and use something to strip a bit of the wire away so you can connect your wire taps. I was being ghetto and used an exacto knife because my wire stripper was too big to fit in and strip wires. Once the wire is stripped a little bit, use a wire tap to connect into the stripped part. Double check that your wire taps are set up correctly with a multimeter. Then crimp the input connector to the positive and negative leads on your A4 cable. Then connect them to the taps you just set up. Again, test with a multimeter to see that everything works well. This step is actually the most involved, once this step is completed the rest is actually quite easy.
Once you have power, the next step is to set up video. Assuming you have an after market radio, there will already be connections in place for both overriding the current video signal with the reverse cameras signal when in reverse, as well as the video input. In either your DIN's instruction manual or on the wires themselves, there will be a label called "reverse camera". This wire essentially replaces the video on the screen with the video comming into the "RCIN" video input when the car is put into reverse. This switch happens only when 12 volts goes thru it. The next is an input section labelled RCIN or some other label, which indicates that it is the video input for your reverse camera. Take note of both of these. Start first by connecting one end of the A5 video input into the RCIN input. Then take the convenience wire and splice it with the "reverse camera" wire. Then route the cables through to the back of the car.
Now install your reverse camera. This can be done easily depending on the reverse camera. Either it can be mounted directly with your licence plate, or it needs to be drilled into the bumper itself. Once this is done another hole needs to be either drilled or found to route your reverse camera wires into the car (so that the rest of the connections can be made, for example the connection to your DIN. What needs to be done again depends on the make and model of the vehicle, thus searching up how on forums or on youtube will be your best bet.
Now once you have reverse camera mounted to your car we can begin the final steps of connecting. Now, splice your convenience wire with the positive wire on A4. Connect your video cable into the dongle in A3. and connect your power wire A4 to the power wire in the dongle on A3. Now everything is connected. Test everything by putting your car in reverse. The DIN's video signal should be overridden by your cameras. If not use a multimeter to check that there is 12 volts going where it should (both to the camera and thru the convenience wire. Futher you may need to perform some continuity checks on your connections to make sure they are fine.